Elevate Your Bathroom Style: How to Raise a Bathroom Vanity
Are you looking to give your bathroom a fresh and modern makeover? One of the most impactful yet often overlooked changes is raising your bathroom vanity. Elevating your vanity not only adds a touch of sophistication to your space but also opens up new design possibilities. In this comprehensive guide, we’ll take you through the steps on how to raise a bathroom vanity, allowing you to seamlessly blend style and functionality. Whether you’re a seasoned DIY enthusiast or a first-time renovator, this step-by-step guide will empower you to transform your bathroom with ease.
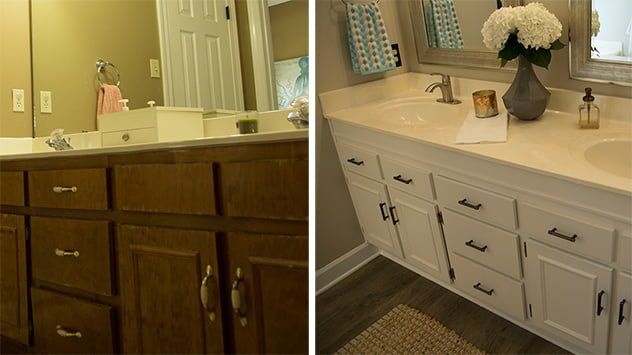
1. Why Raise Your Bathroom Vanity?
Bathroom vanities come in various heights, and sometimes the existing one may not align with your comfort or style preferences. Raising your vanity can offer several benefits:
Improved Comfort: A higher vanity can reduce strain on your back and neck, making your daily routines more comfortable.
Enhanced Style: Elevating the vanity can give your bathroom a modern or custom look, adding a touch of elegance to the space.
Additional Storage: Raising the vanity can create space underneath, allowing you to install additional storage solutions or simply keep the area clean and tidy.
2. Planning Your Vanity Elevation
Before you embark on the project, it’s essential to plan and prepare:
Measure the Height: Determine how much you want to raise the vanity. Consider the ideal height for your comfort and style
Check Plumbing: Ensure that raising the vanity won’t interfere with the existing plumbing connections
Select Materials: Choose the materials you’ll use to raise the vanity, such as wooden blocks, metal legs, or custom cabinetry
Gather Tools: Get the necessary tools, like a drill, screws, and a level, to complete the job.
3. How To Raise A Bathroom Vanity
Prepare the Area
When you’re ready to raise your bathroom vanity, start by clearing the area beneath it. Remove any items or storage that might be in the way. Next, turn off the water supply to the sink to ensure a safe working environment. After that, carefully disconnect the plumbing connections. This step is crucial to avoid any water leaks or damage during the elevation process.
Raise the Vanity
To elevate your bathroom vanity, place the chosen materials – whether it’s wooden blocks, metal legs, or custom cabinetry – underneath the vanity. These materials will raise the vanity to your desired height. To ensure a level surface, use a level tool during this process. This step is crucial to achieving both stability and a polished final result.
Reconnect Plumbing
After raising your bathroom vanity, it’s essential to reconnect the plumbing connections securely. Make sure they are watertight to prevent any leaks. Once the connections are in place and secure, turn the water supply back on. Be vigilant and check for any potential leaks to ensure that everything is functioning correctly. This step guarantees a hassle-free and functional bathroom vanity at its new height.
4. Finishing Touches
Cover and Decorate
To give your elevated bathroom vanity a polished appearance, consider adding a decorative panel or a fabric curtain. This serves a dual purpose: it conceals the structural elements underneath and contributes to the overall look and style of the vanity. This finishing touch adds an aesthetic element to your bathroom and completes the elevated vanity’s appearance.
Check for Stability
After raising your bathroom vanity, it’s crucial to ensure that it’s stable and secure. A simple test involves giving it a gentle shake to check for any wobbling or instability. If you notice any issues, take the necessary steps to reinforce the support or connections. This ensures the long-term durability and functionality of your elevated vanity.
After successfully raising your bathroom vanity, it’s crucial to ensure its stability for long-term durability. Conduct a simple shake test to detect any wobbling or instability. If issues are found, follow these steps:
1. Tighten loose screws in the vanity structure.
2. Reinforce wall mounting for wall-mounted vanities.
3. Add support to the legs or use support brackets for freestanding vanities.
4. Install floor bracing for floor-mounted vanities.
5. Apply construction adhesive to joints and connections.
6. Seek professional help if needed.
Investing time in these reinforcement steps will guarantee a stable and secure raised bathroom vanity, preventing potential issues in the future.
5. Enjoy Your Elevated Vanity
With your bathroom vanity raised to the desired height and all the finishing touches in place, it’s time to enjoy your updated bathroom space. Revel in the improved comfort, enhanced style, and extra storage that your elevated vanity brings to your daily routines.
Elevating a bathroom vanity is a DIY project that can significantly enhance your bathroom’s functionality and aesthetics. Whether you want to reduce strain on your back, modernize your bathroom, or create extra storage space, raising your vanity is an investment in both comfort and style.
(FAQs) about raising a bathroom vanity
Q1: Can I raise any type of bathroom vanity?
Most bathroom vanities can be raised, but the process may vary depending on the style and construction. Be sure to assess your specific vanity and consult the manufacturer’s recommendations.
Q2: Do I need to hire a professional to raise my bathroom vanity?
While it’s possible to raise a bathroom vanity as a DIY project, it may require some plumbing and carpentry skills. Hiring a professional can ensure the job is done correctly.
Q3: How much does it cost to raise a bathroom vanity?
The cost can vary depending on the materials you choose and whether you do it yourself or hire a professional. DIY projects tend to be more budget-friendly.
Q4: Can I still use the same sink and faucet after raising the vanity?
In most cases, you can use the same sink and faucet if the plumbing connections align with the raised vanity’s new height. However, you may need to adjust or extend the plumbing.
Q5: What materials are suitable for raising a bathroom vanity?
Common materials for raising a bathroom vanity include wooden blocks, metal legs, or custom cabinetry. The choice of material depends on your preferences and the desired aesthetic.
Q6: Are there any style considerations when raising a bathroom vanity?
Raising your vanity can be an opportunity to update the bathroom’s style. You can choose materials and finishes that complement your preferred aesthetic.
Conclusion
Raising a bathroom vanity is a rewarding project that offers both practical and aesthetic benefits. It’s an opportunity to customize your bathroom to your preferences, creating a more comfortable and stylish space. By following the steps outlined in this guide, you can elevate your vanity with confidence, ultimately enhancing your daily routines and bathroom experience.
This post has walked you through the process of raising a bathroom vanity, providing valuable insights and tips to help you successfully complete the project.
