The Ultimate Guide to Roughing In a Basement Bathroom
Are you considering adding a bathroom to your basement? Creating a cozy, convenient, and functional bathroom space in your basement can significantly enhance the overall comfort and value of your home. Roughing in a basement bathroom is the crucial initial step in this exciting home improvement project. How Much To Rough In A Basement Bathroom?
In this comprehensive guide, we’ll delve into the details of roughing in a basement bathroom, offering a step-by-step approach to ensure your DIY venture is a resounding success.
Why Rough In a Basement Bathroom?
Adding a bathroom to your basement can be a game-changer. It provides convenience, especially if you frequently use your basement for recreational purposes or as an additional living space. Moreover, it can boost the resale value of your home, making it an appealing investment.
How Much To Rough In A Basement Bathroom
Step 1: Planning and Design
Measure and Layout
- Measure the Available Space: The first task is to measure the available space in your basement where you plan to install the bathroom. Accurate measurements are essential to ensure that all fixtures fit comfortably within the designated area. Use a measuring tape to record the dimensions of the space.
- Determine the Layout: With the measurements in hand, you can now determine the layout of your basement bathroom. Consider the following aspects:
- Fixture Placement: Decide on the placement of fixtures such as the toilet, sink, and shower or bathtub. Think about how you want these elements to be arranged in the available space.
- Clearances: Ensure there is adequate space around each fixture. For instance, there should be enough room in front of the toilet for comfortable use, and there should be sufficient space around the sink and shower/tub for ease of movement.
- Door Placement: Consider the location of the bathroom door. Ensure that it allows for easy access and doesn’t obstruct other parts of the basement.
- Lighting and Ventilation: Plan for appropriate lighting and ventilation. Think about where you’ll place light fixtures and ventilation fans to ensure a well-lit and comfortable bathroom.
- Consider Accessibility: If you have family members with specific mobility needs, it’s essential to design the bathroom with accessibility in mind. This might involve choosing fixtures that are ADA-compliant or ensuring that there’s enough space for a wheelchair to maneuver if necessary.
Plumbing and Drainage
- Plan the Plumbing System: Carefully plan the plumbing system for your basement bathroom. Start by considering the location of the existing plumbing in your home. You’ll need to connect your new plumbing to the existing lines, which may be in the walls or floors above.
- Choose Fixture Locations: Based on your layout decisions, determine the exact locations where you want each fixture. For instance, decide where the toilet will be, where the sink will be mounted, and where the shower or bathtub will go.
- Water Supply Routes: Plan the routes for the water supply lines that will feed into your fixtures. These lines will provide fresh water to your sink, toilet, shower, or tub. Ensure that you choose the most efficient and direct routes, keeping in mind that they’ll need to connect to your home’s main water supply.
- Waste Line Routes: Similarly, plan the routes for the waste lines or drainpipes that will carry wastewater away from your fixtures. These lines need to connect to your home’s main sewer or septic system. Ensure that they have a proper slope for effective drainage.
By meticulously measuring the space and carefully planning the layout, plumbing, and drainage, you’ll set the foundation for a successful basement bathroom project. This thoughtful preparation in Step 1 will help you avoid costly mistakes and ensure that your new bathroom not only functions well but also meets your aesthetic and accessibility needs.
Step 2: Obtain Necessary Permits
Before you start any work, it’s essential to obtain the required permits from your local building department. This ensures that your project complies with local building codes and regulations.
Step 3: Gather the Essential Tools and Materials
This involves gathering the essential tools and materials, which is a critical preparation phase before you start roughing in your basement bathroom.
Tools:
- Pipe Wrench: A pipe wrench is a heavy-duty tool used for gripping and turning pipes and fittings. It’s essential for securing and tightening plumbing connections.
- Pipe Cutter: A pipe cutter is used to cut pipes cleanly and evenly. It ensures precise cuts, which are vital for creating leak-free connections.
- Hacksaw: A hacksaw is another tool for cutting pipes, especially when dealing with smaller pipes or in tight spaces where a pipe cutter might not fit.
- Measuring Tape: A measuring tape is crucial for accurately measuring pipe lengths, distances between fixtures, and other dimensions in your bathroom layout.
- Plunger: While not directly related to plumbing installation, a plunger is a handy tool to have on hand for clearing clogs in your plumbing system. It can save you from potential blockages down the line.
- Adjustable Wrench: An adjustable wrench is used for tightening and loosening various plumbing connections, such as nuts and bolts.
- Screwdriver: A screwdriver is a versatile tool needed for various tasks, including securing fixtures, tightening screws, and assembling components.
- Plumber’s Tape (Teflon Tape): Plumber’s tape, also known as Teflon tape, is used to seal threaded connections and prevent leaks. It’s wrapped around the threads of pipes and fittings before assembly.
- Level: A level is crucial for ensuring that fixtures like the toilet, sink, and shower/tub are installed perfectly level and plumb. This ensures that water flows correctly and prevents leaks.
Materials:
- Pipes (PVC or Copper): The type of pipes you choose for your plumbing system will depend on your preferences and local building codes. PVC (polyvinyl chloride) pipes are commonly used for drain lines, while copper pipes are often used for water supply lines.
- Drainage Fittings: These fittings are used to connect and direct drainpipes to the main sewer or septic system. They include elbows, couplings, tees, and other components necessary for configuring the drainage system.
- Water Supply Lines: Water supply lines are typically made of copper or flexible PEX tubing. These lines transport fresh water from your home’s main supply to the fixtures in your bathroom.
- Toilet Flange: The toilet flange is a critical component that secures the toilet to the floor and connects it to the drainpipe. It ensures a watertight seal between the toilet and the waste line.
- Shower/Tub Valve: The shower or tub valve controls the flow of water to your shower or bathtub. It’s an essential component for regulating water temperature and pressure.
- Sink and Faucet: The sink and faucet are fixtures that provide access to fresh water for washing hands and other daily activities. Ensure you have the specific sink and faucet you plan to install.
By having these tools and materials ready before you start your basement bathroom project, you’ll be well-prepared to tackle each step efficiently. Proper tools and high-quality materials are key to achieving a professional and reliable plumbing installation.
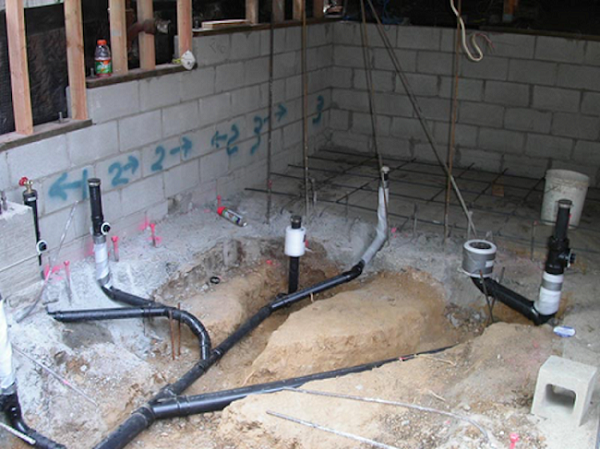
Step 4: Install Drainage System
Step 4, which involves installing the drainage system for your basement bathroom, is a crucial part of roughing in the plumbing.
4.1 Install Drain Pipes
Drain pipes are a fundamental part of your bathroom’s plumbing system. They carry wastewater away from the sink, toilet, shower, or tub to the main sewer or septic system. Proper installation of drain pipes is critical to ensure effective drainage and prevent leaks or clogs. Here’s how to go about it:
- Select the Right Drain Pipes: Choose the appropriate type and size of drain pipes for your project. Common materials for drain pipes include PVC (polyvinyl chloride) and ABS (acrylonitrile butadiene styrene). Ensure that the pipes have the necessary slope for efficient drainage. Typically, a slope of 1/4 inch per foot is recommended.
- Cut and Assemble the Pipes: Use your pipe cutter or hacksaw to cut the drain pipes to the required lengths. Make precise, square cuts to ensure proper connections. Then, assemble the pipes using fittings like elbows, couplings, and tees to create the drainage network.
- Secure the Pipes: Use pipe hangers or straps to secure the drain pipes to the framing or support structures in your basement. This prevents sagging or movement that could lead to drainage problems over time.
- Connect to the Main Drain Line: Ensure that the drain pipes connect properly to the main sewer or septic line. This typically involves creating a sanitary tee or Y-fitting connection that allows wastewater to flow into the main line.
- Test for Leaks: Before proceeding to the next steps, conduct a water test to check for leaks in your drain pipes. Plug all openings in the pipes and fill them with water. Observe for any signs of leakage and address any issues promptly.
4.2 Connect the Toilet Flange
The toilet flange is a critical component that secures the toilet to the floor and connects it to the drainpipe. It’s essential to ensure a proper and secure installation to prevent leaks and maintain the integrity of your bathroom’s plumbing. Here’s how to do it:
- Position the Flange: Place the toilet flange at the designated spot on the bathroom floor. The flange should align with the waste pipe opening on the floor.
- Secure the Flange: Attach the flange to the floor using screws or bolts, ensuring that it is level and securely in place. The flange should sit flush with the floor surface.
- Prepare for Toilet Installation: Once the flange is securely installed, you’re ready to proceed with installing the toilet. The toilet will be mounted on top of the flange, and the wax ring will create a watertight seal between the toilet and the flange.
Properly installed drain pipes and a secure toilet flange are essential components of your basement bathroom’s plumbing system. They ensure that wastewater is efficiently transported away from your bathroom fixtures while preventing potential leaks or damage to your basement floor. By following these steps diligently, you’ll lay the groundwork for a functional and trouble-free bathroom plumbing system.
Step 5: Water Supply Installation
This involves installing the water supply lines for your basement bathroom, which is crucial to ensure that your fixtures receive fresh water for operation.
5.1 Install Water Supply Lines
Water supply lines are responsible for bringing fresh, potable water to your bathroom fixtures, including the sink, toilet, and shower or tub. Proper installation is vital to ensure a reliable water supply. Here’s how to install water supply lines:
- Select the Right Water Supply Lines: Depending on your preferences and local plumbing codes, you can choose between copper pipes or flexible PEX tubing for your water supply lines. Ensure that the chosen material is suitable for your project.
- Measure and Cut the Lines: Measure and cut the water supply lines to the appropriate lengths for each fixture. Ensure that your cuts are clean and square for proper connections.
- Attach Fittings: Install the necessary fittings on the ends of the supply lines. Common fittings include compression fittings or push-fit fittings. These fittings will connect the supply lines to the fixtures.
- Connect to Fixtures: Connect one end of each water supply line to the corresponding fixture. For instance, connect the water supply line to the bottom of the sink faucet, the fill valve on the toilet, and the shower or tub valve.
- Secure and Tighten: Ensure that all connections are securely tightened. Use an adjustable wrench to snugly tighten compression fittings or follow the manufacturer’s instructions for push-fit fittings.
- Turn Off the Main Water Supply: Before proceeding further, ensure that the main water supply to your home is turned off. This prevents water from flowing through the newly installed lines until you’re ready to test them.
5.2 Check for Leaks
Once you have installed the water supply lines, it’s essential to check for leaks before moving on to the next stages of your basement bathroom project. Here’s how to perform this crucial check:
- Turn on the Water Supply: Gradually turn on the main water supply to your home to allow water to flow through the newly installed supply lines. Do this slowly to avoid sudden pressure surges.
- Inspect for Leaks: Carefully inspect all the connections, joints, and fittings for any signs of water leakage. Look for drips, puddles, or damp areas around the connections.
- Check All Fixtures: Turn on each fixture individually, including the sink faucet, toilet, shower, or tub, and check for leaks while they are in use. Make sure that water flows smoothly without any unusual noises or issues.
- Address Leaks Promptly: If you notice any leaks, address them immediately. This may involve tightening connections further, replacing faulty fittings, or adjusting components to ensure a watertight seal.
- Turn Off the Water Supply: Once you have confirmed that there are no leaks and that all fixtures are functioning correctly, turn off the main water supply again until you’re ready for the final testing phase.
Checking for leaks is a critical step to ensure that your water supply lines are correctly installed and that there are no potential issues that could lead to water damage or waste. Addressing leaks promptly will save you from potential headaches down the road and ensure the reliability of your basement bathroom’s plumbing system.
Step 6: Ventilation and Vent Pipes
Proper ventilation is crucial in any bathroom to maintain indoor air quality, prevent moisture buildup, and eliminate foul odors. Vent pipes are an integral part of the plumbing system and play a key role in achieving proper bathroom ventilation.
6.1 Install Vent Pipes
Vent pipes, also known as ventilation pipes or vent stacks, are designed to:
- Prevent Traps from Being Siphoned: When water flows down a drain, it creates a vacuum behind it. Without vent pipes, this vacuum could potentially siphon the water out of traps in drain pipes, allowing sewer gases to enter your home. Vent pipes break this vacuum, maintaining the water seal in traps.
- Allow Airflow: Vent pipes provide a pathway for air to enter the plumbing system. This helps wastewater flow more smoothly, prevents gurgling sounds, and prevents water from being trapped in the drainpipes.
To install vent pipes:
- Plan Pipe Placement: Determine the optimal locations for vent pipes. They are typically routed vertically through the roof, but you can also connect them horizontally to existing vent stacks if applicable.
- Size of Vent Pipes: Consult local plumbing codes to determine the appropriate size for your vent pipes. Common sizes are 1.5 inches or 2 inches in diameter.
- Install Vent Pipes: Cut and install vent pipes according to the planned layout. Ensure that they have a proper slope for drainage. Secure them to the framing or support structures to prevent movement.
- Connect to Fixtures: Connect vent pipes to the drain pipes serving each fixture. Proper connections and fittings are essential to maintain the integrity of the venting system.
- Vent Termination: Vent pipes must extend through the roof or an exterior wall to allow for the release of sewer gases and intake of fresh air. Install roof flashing or wall caps to protect against moisture infiltration.
Step 7: Test the System
Step 7 involves testing your plumbing system to ensure it functions properly and without leaks. There are two primary tests:
7.1 Pressure Test
A pressure test assesses the integrity of your plumbing system by pressurizing it with air or water to detect leaks. Here’s how to perform a pressure test:
- Seal all openings in the plumbing system, including drains, vents, and fixture openings.
- Use a pressure testing gauge to pressurize the system to a specified pressure, usually around 15-20 psi.
- Monitor the pressure for a set duration, typically 15-20 minutes. A drop in pressure indicates a potential leak.
- Identify and address any leaks found during the test. This may involve tightening fittings or replacing components.
7.2 Functional Test
The functional test ensures that each fixture (toilet, sink, shower, or tub) operates as expected. Here’s how to perform a functional test:
- Turn on the water supply and operate each fixture individually.
- Check for proper flow, flushing, and drainage.
- Listen for unusual noises or vibrations that could indicate issues.
- Ensure that there are no visible leaks or water damage during fixture operation.
- Address any functional issues promptly.
Step 8: Finalize and Seal the Walls
Once you’ve confirmed that the plumbing system is functioning flawlessly and that your vent pipes are in place, you can proceed to finalize the walls and floors around the fixtures. This step typically involves:
- Installing drywall or other wall coverings
- Tiling or flooring installation
- Sealing gaps around fixtures and pipes to prevent moisture intrusion
- Adding any final touches or fixtures, such as mirrors, towel bars, and accessories
By completing these final touches, you’ll be well on your way to having a fully functional and aesthetically pleasing basement bathroom. This sets the stage for the next phases of your project, such as installing fixtures and adding the finishing touches to make your bathroom space comfortable and attractive.
Conclusion
How Much To Rough In A Basement Bathroom, Roughing in a basement bathroom is a critical step in creating a fully functional and attractive addition to your home. By carefully planning, obtaining necessary permits, gathering the right tools and materials, and following each step meticulously, you’ll be on your way to a successfully roughed-in basement bathroom. Embrace this DIY journey and watch your basement transform into a more comfortable and convenient living space.
